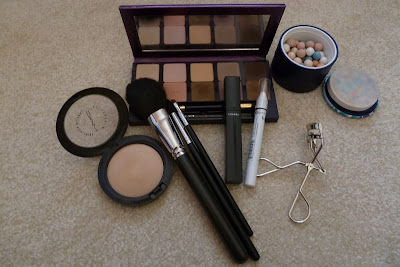
This is a foolproof polished makeup look for the lazy person.
Because I don't like having products on my face (not foundation, not blush, not highlighter), this may also be ideal for the normally non-makeup wearer. It's about looking polished with minimal effort, for those days when you don't want to look like you just rolled out of bed (which is the 'look' I usually sport). Furthermore, it does not involve eyeshadows (except for eyebrows), thus eliminating the labourious process of blending.
It goes without saying, but I'm going to say it nonetheless. This is all about sharing with you what works for me, and hoping that it can benefit you in some way. We all have different likes, dislikes, tendencies, and needs. By no means do you have to follow my routine to a 'T'--or any letter in the alphabet, for that matter. Don't hesitate to adapt or experiment with any of the following steps to your own routine.
Here are my tools, but feel free to substitute them with your favourites:
Eyebrows:
- Sigma SS266 (now E75)
- Tarte Neutraleyes Volume ii Palette (Top two right colours)
- Ring Finger (not pictured)
- NYX Jumbo Eye Pencil, Milk
Eyes:
- Shu Uemura Eyelash Curler
- Sublime de Chanel Mascara
Face:
- Sigma SS224 (now E40)
- Guerlain by Emilio Pucci Meteorites Perles d'Azur
- MAC 150 Powder Brush
- MAC Mineralized Skin Finish, Medium
I know. It all seems wrong. Let me explain.
First, I fill in my eyebrows by mixing the two top right colours in the Neutraleyes palette. As I said before, I apply 3:1 mixture of Matte Pebble and Matte Espresso, respectively. That is, I tap my Sigma SS266 brush three times on Matte Pebble and once on Matte Espresso to achieve a cooler brow colour. Please click here for MoxieReviews' swatches.
Next, I use my NYX Jumbo Eye Pencil for highlighting action. Now, I know that the norm is to highlight the inner corner and to line the waterline with a white or flesh-toned colour. What I propose is something quite different and it is not without reason (YES, double negatives. Don't you love?). Inner-corner highlights never seem to draw attention to my eyes in a way that is attractive. Of course, this could be due to shoddy application on my part, but that only goes to show that this technique isn't a one-and-done type of deal. Inner-corner highlighting does require some skill. At least for me. If that didn't convince you about the hardships of inner-corner highlighting, then perhaps reminding you that applying anything onto the inner corner tends to cause gook to collect in the tear duct. Notwithstanding potential hygiene issues, it simply ain't pretty. Am I right or am I right? In the same tune, I never apply products to my waterline, nor do I ever tightline, because the thought of applying products there sends shivers up my spine. I mean, those areas are meant to clean your eyes, so when girls complain that products don't stay on, it's like being angry that your body is doing its job properly.
What I do instead (not claiming creative ownership in any way shape or form. I'm pretty sure I learned this from KandeeJohnson. Don't remember which video, though. I tried looking.) is, I take the Jumbo Eye Pencil and draw lines. One line under the arch of the eyebrow, and three lines in the shape of crow's feet (See? We're even turning a negative into a positive here!) on the outer-corner of the eye. Then I take my ring finger and blend, blend, blend (Hi, Koren).
 |
| The grey lines represent the Milk lines. Because Milk is so pigmented, one swipe does the trick. |
 | |||||||||
| Top to Bottom: (Please ignore the top two swatches of UD's Sin) Milk blended, Milk with 2 swipes, Milk with 1 swipe |
On my face, I use the MAC 150 brush to apply the Meteorites. After this revelationary video by gossmakeupartist, I no longer swipe the product onto my face. Yes, I still use a powder brush, but I listened to what he said. That is, I swirl my brush in the product, and place the flat side of the bristles on the desired area and roll on the product.
Then, I take my SS224 brush and apply the MAC MSF Medium on the center of my forehead and around my nose (to neutralize the redness). That's why I use a small, fluffy blending brush to apply the MSF, because I get a more precise application around the nooks and crannies of my nose. Once the MSF sets on your face (ie. mixes with your natural face oils), it does not look powdery or completely matte. It does mattify my forehead, which is why I put it there, but it maintains a natural skin appearance. If I'm feeling adventure, I apply some under my eyes. Please click here for KarlaSugar's swatches.
And that's it. The hardest part of this is applying the mascara.
-R

No comments:
Post a Comment